Download Printable Instructions
Step 1Using black dough, make a large, rectangular cube and a smaller, thick circle. Position the circle at the center of the rectangle, this will be the camera body. |
|
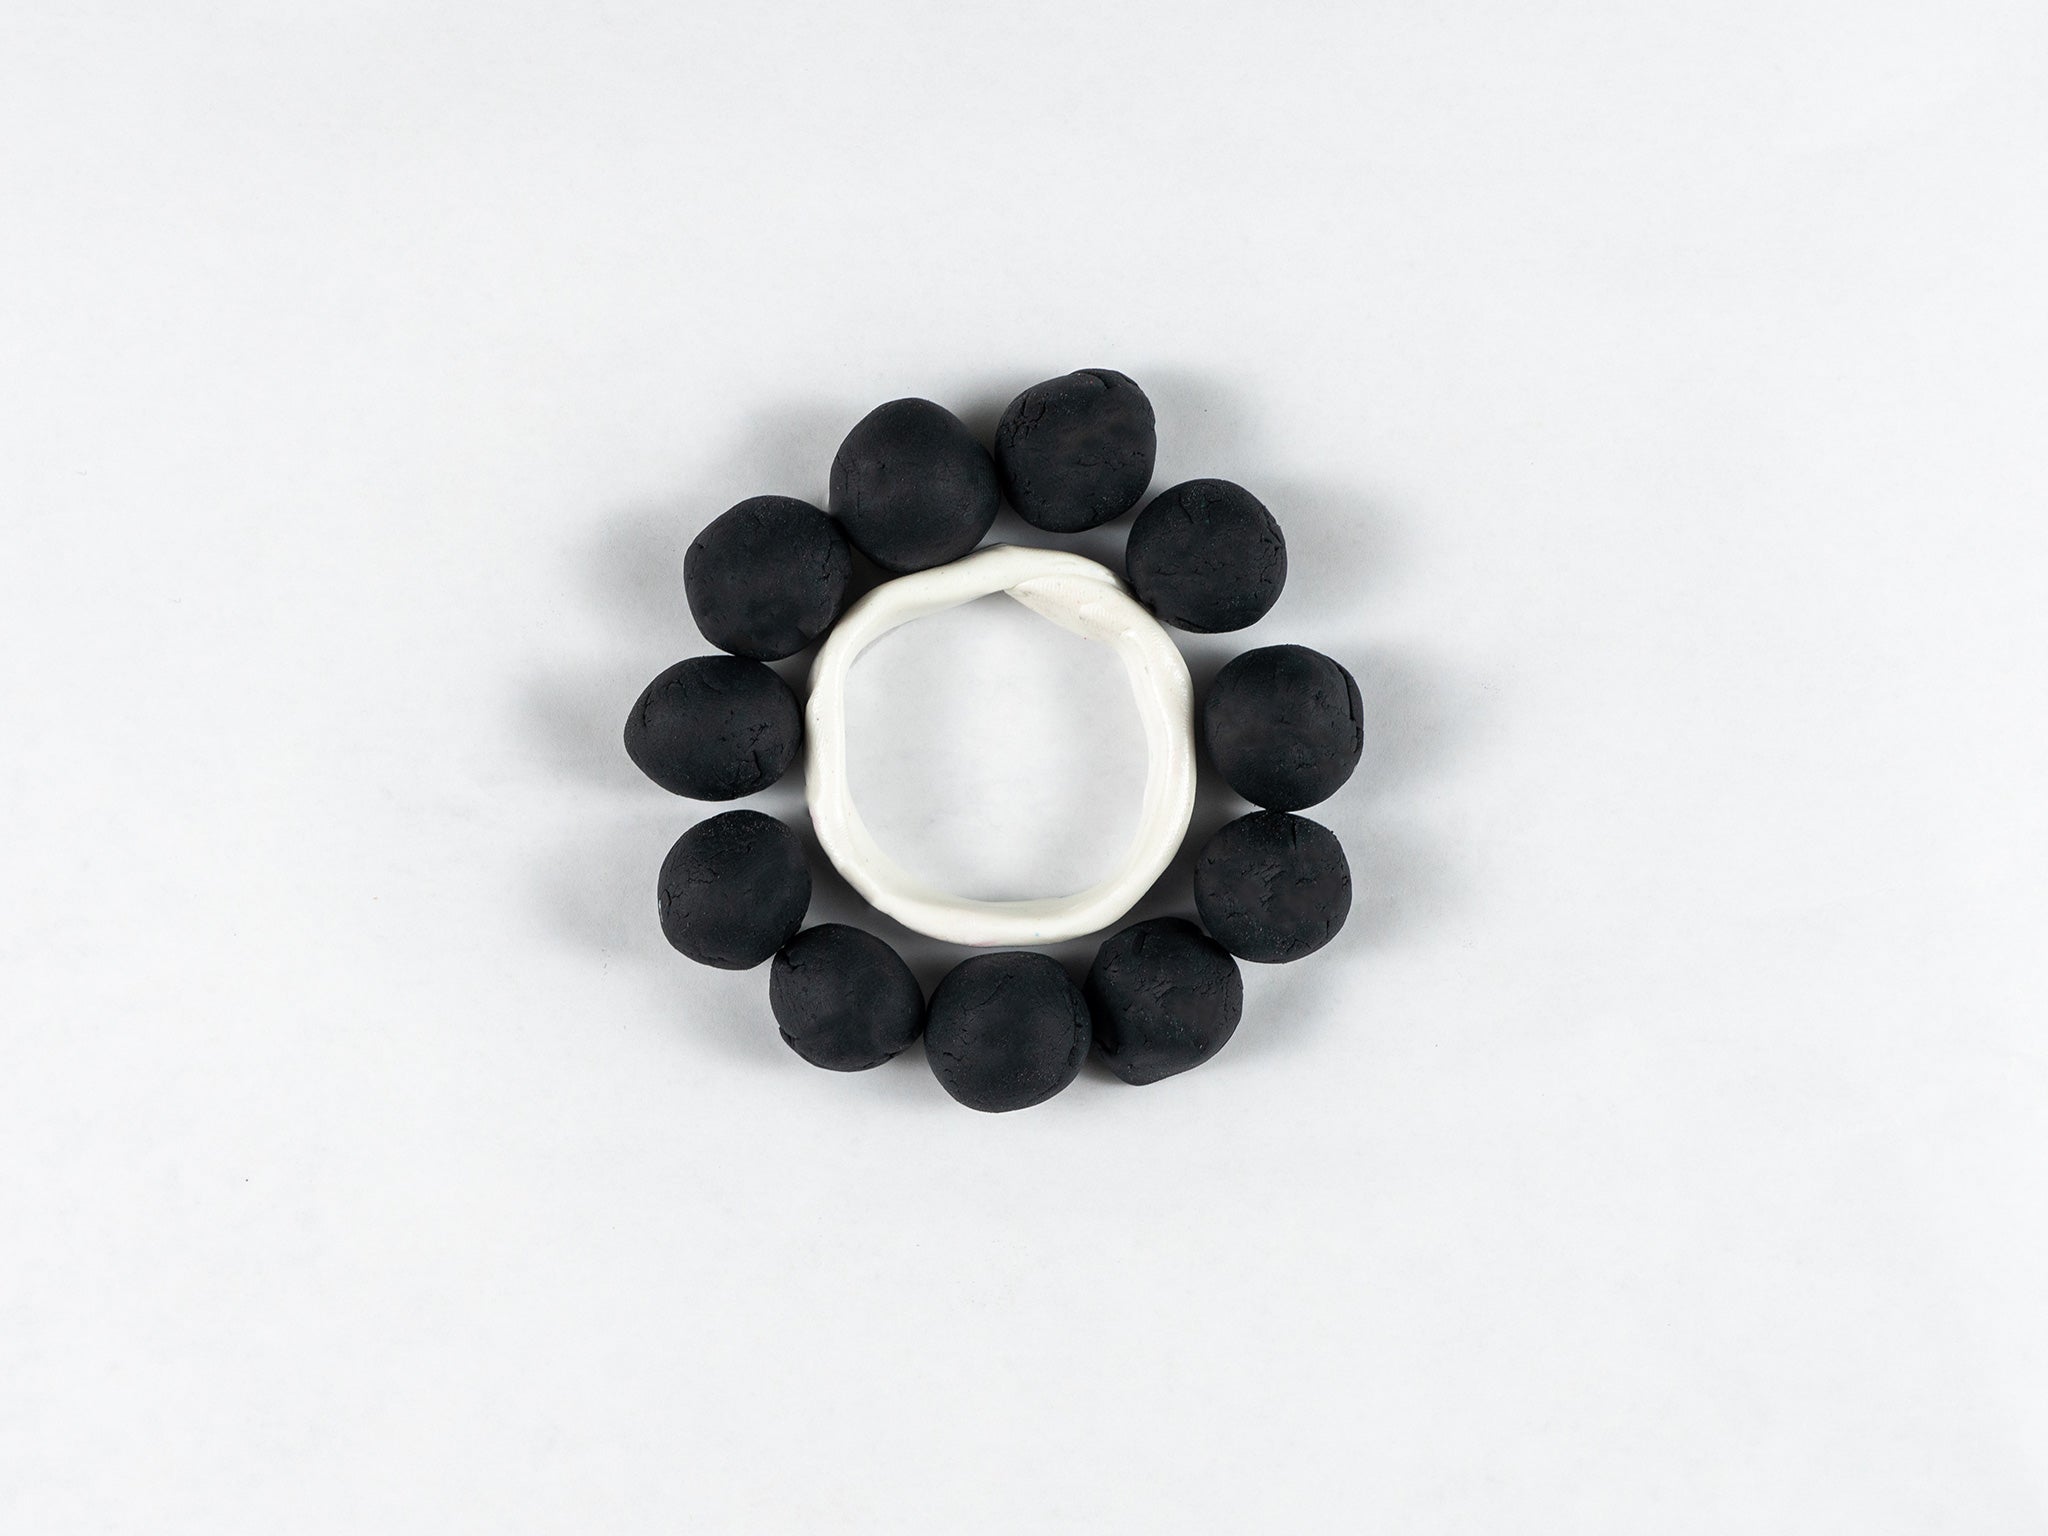
Step 2Roll out a long strip of white dough and wrap it around the black circle until both ends meet, completing the lens. |
|
Step 3Create a small, flat rectangle using white dough and place it on top of the large rectangular cube. |
|
Step 4Craft a small, rectangular cube with black dough. With the yellow dough, craft a slightly smaller rectangle. Position the yellow rectangle at the center of the black one. Place both of these on top of the white rectangle from step 3, positioned upright and facing the lens as shown below. |
|
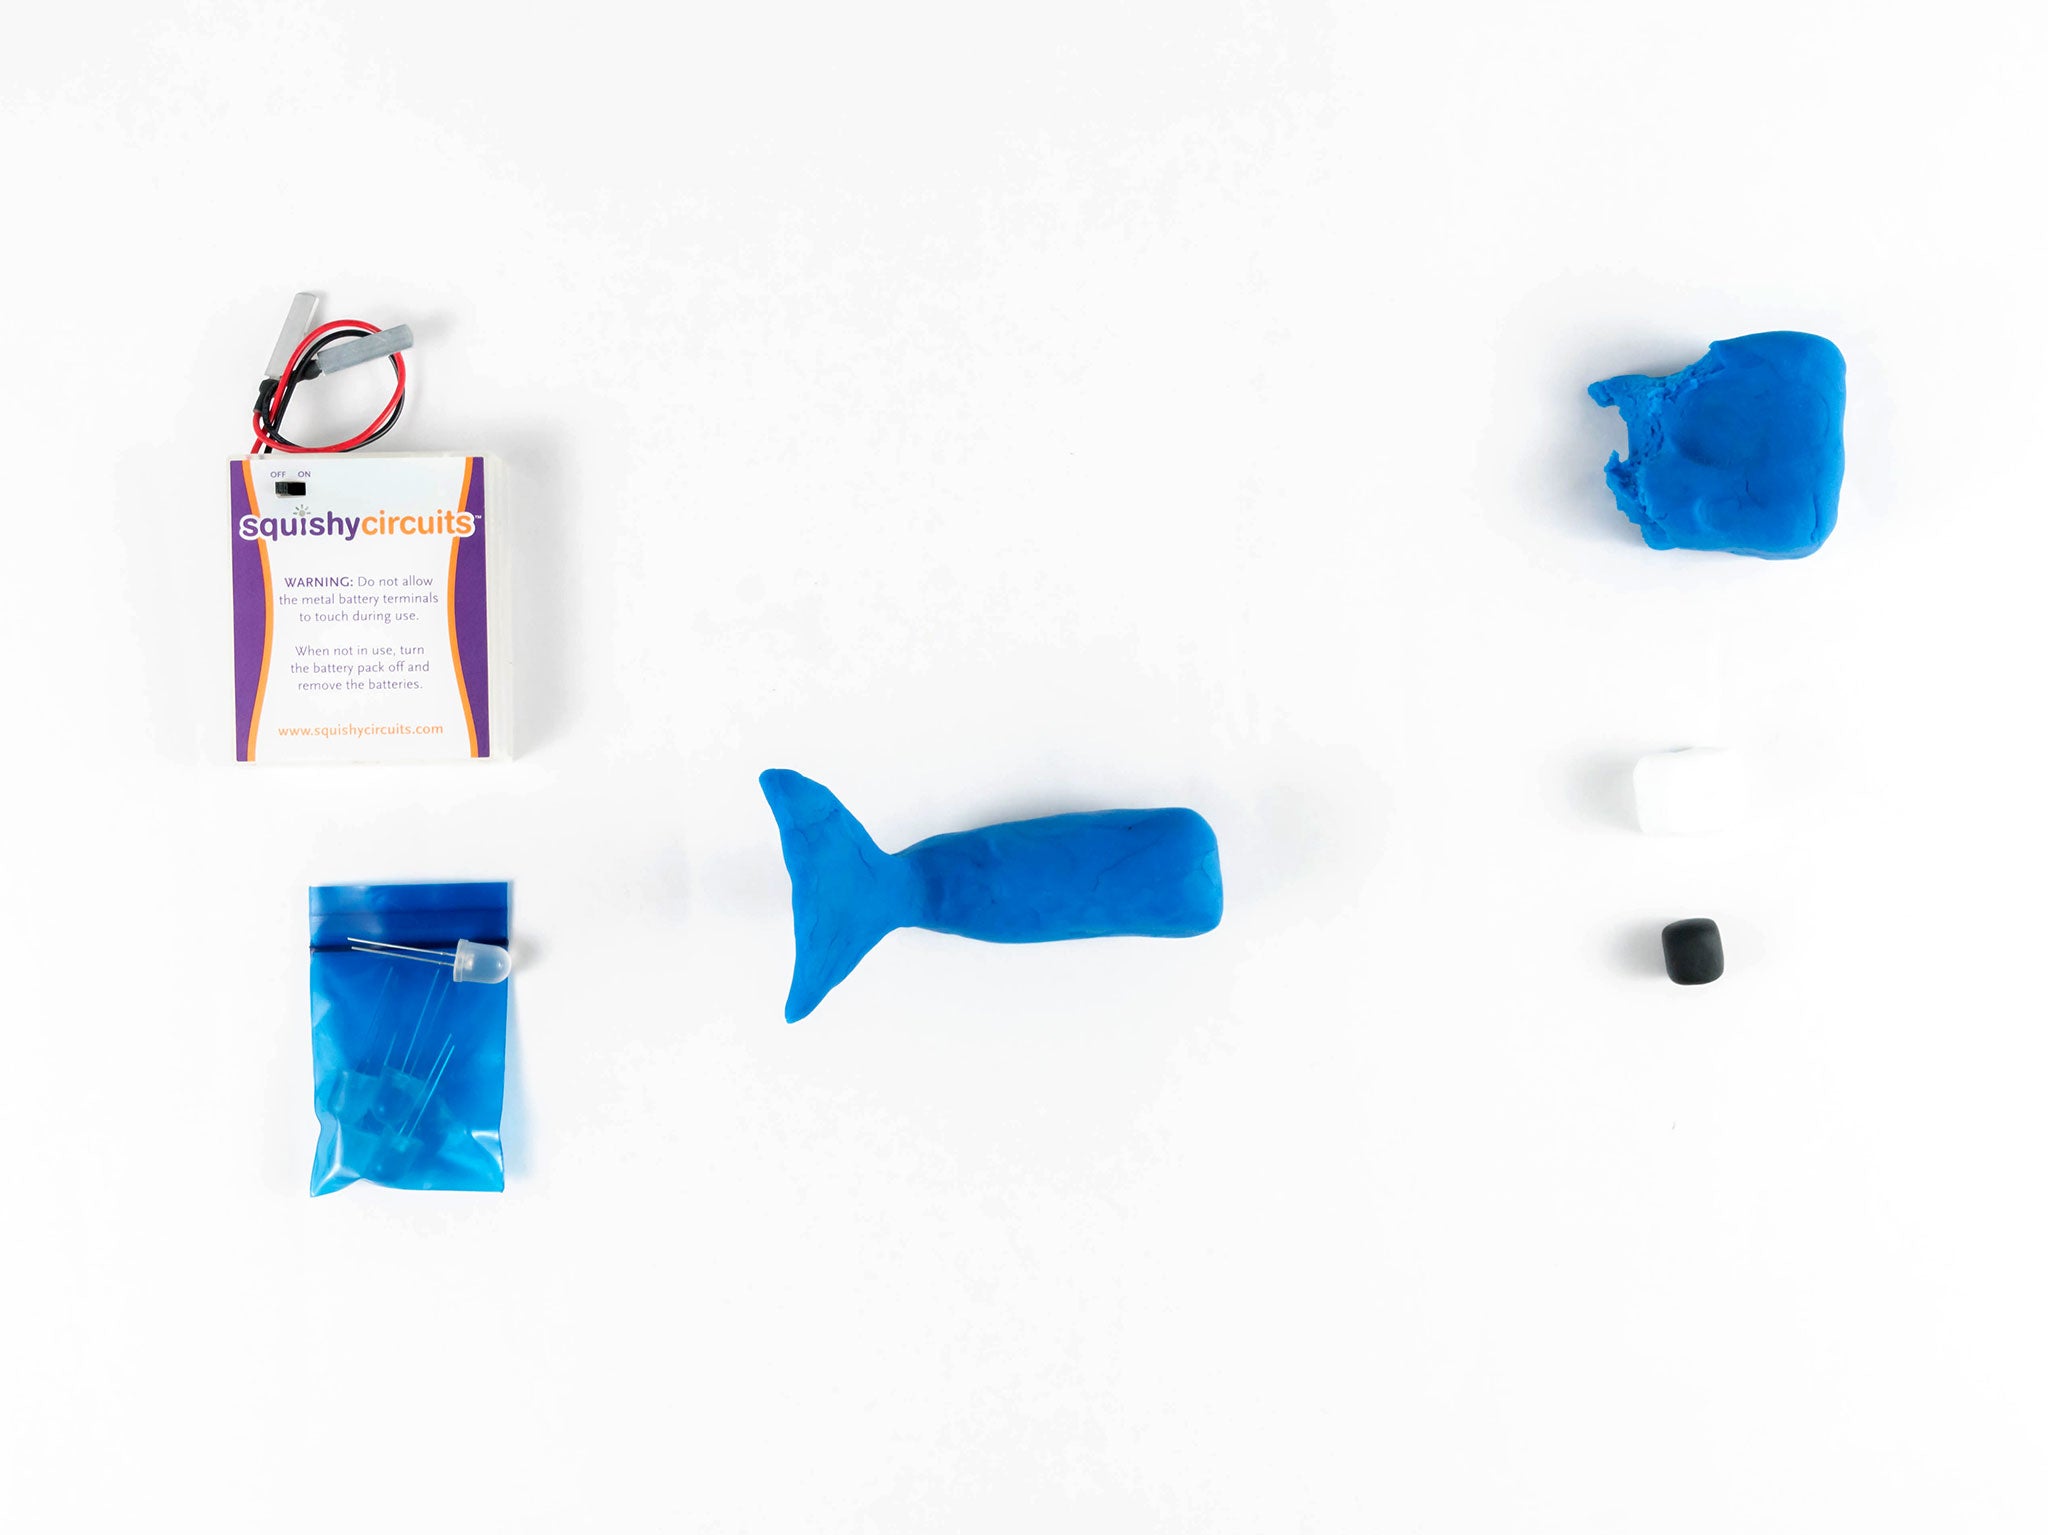
Step 5Attach the LEDs, with the longer leg going into the yellow rectangle and the shorter leg inserted into the black body of the camera, representing the camera’s flash. |
|
Step 6Shape a ball of black dough and keep it separate from the camera. Connect the reed switch's black wire to the black rectangle on top of the camera and then the red wire to the dough ball, establishing the circuit. Connect the black wire from the battery holder to the body of the camera, then connect the red wire to the black dough ball. Flip the battery holder switch to "on." Tap the magic wand on the reed switch to activate the camera’s flash. |
Download Printable Instructions
Step 1Create the stripes by rolling the white and red dough and dividing it into three even pieces. Save a smaller piece of red for the left side of the flag. |
|
Step 2Next, use the blue and white dough to make the rectangle background for the LED lights. |
|
Step 3Place the blue and white rectangles on top of the stripes. |
|
Step 4Attach four LEDs by inserting the legs into the colored dough. Make sure that the longer leg is inserted into the red dough and the shorter leg is inserted into the blue dough. |
|
Step 5Attach the battery holder to the flag by inserting the black wire into the blue dough and the red wire into the red dough. Turn on the power switch from the battery holder to make the lights shine! |
Step 1Roll out a piece of purple, blue, green, yellow, orange, and red dough, increasing length of each piece. |
|
Step 2Next, connect each piece of dough and form an arch shape. |
|
Step 3Take a piece of white insulating dough and form into a cloud shape. Attach the cloud to the end of the right side of rainbow. |
|
Step 4Take a piece of blue dough and attach it to the bottom of the cloud. |
|
Step 5Insert the longer leg of each LED into the coordinating piece of colored dough and the shorter legs into the blue dough. |
|
Step 6Insert the red wire from the battery holder into the red strip of dough and the black wire into the blue dough below the cloud. Turn on the battery holder to light up your rainbow! |
]]>
Download Printable Instructions
]]>
Step 1Begin by forming a fire ring using white insulating dough. |
|
Step 2Next, line the outside of the fire ring with small round pieces of black dough. These will be the rocks around your fire ring. |
|
Step 3Create a thick disc shape, using red dough and place the disc inside of the white fire ring. |
|
Step 4Using both the orange and red dough create the flame licks for inside the fire ring. Create three licks of both colors. Next, place the flame licks onto the red disc shape inside of the fire ring. Be sure to alternate the colors when placing. |
|
Step 5Add in four LEDs to your fire. When inserting the terminals from the LEDs, be sure to have the long terminals inserted into the black dough. The short terminals will then be inserted into the red disc inside the fire ring. |
|
Step 6Light up your fire by attaching the battery holder wires. Insert the red wire from the battery holder into one of the black dough pieces. Next, insert the black wire into the red disc inside the fire ring. Turn the power switch on the battery holder to "on" to light up the fire! |
Step 1Create the body of the turtle by forming a circle shape using the green dough. |
|
Step 2Next, create four legs using the green dough and attach each to the body. |
|
Step 3Create the head by rolling a ball of green dough. Flatten a piece of white dough and attach both to the body. |
|
Step 4Attach two googly eyes to the head (optional). |
|
Step 5Create the turtle’s shell by flattening a piece of orange dough into a circle shape. Add the shell pattern using the dough knife. |
|
Step 6Insert the long LED legs into the turtle’s shell and the short legs into the turtle’s head. |
|
Step 7Last, insert the red wire from the battery holder into the body of the turtle and the black wire into the head. Turn on the battery holder to light up your turtle! |
Step 1Begin by forming the body for each of the three fireflies. Each one will use a different color for the body. |
|
Step 2Next, make the wings using the white insulating dough. Two wings will be needed for each firefly body. Attach the wings as shown. |
|
Step 3Attach two googly eyes to each firefly body for a fun effect! |
|
Step 4Create a module using the yellow dough and purple dough. Place a small portion of white insulating dough in between the yellow and purple dough. |
|
Step 5Place each firefly on top of a wired LED. Make sure the red wire is always on the right side. The LED should extend from the back of the firefly body. |
|
Step 6Attach the wired LED lights to the module by inserting the red wire from each firefly into the yellow dough and inserting the black wires into the purple dough. Complete the circuit by inserting the red wire from the battery holder into the yellow dough and the black wire into the purple dough. Turn on the power switch from the battery holder to light up the fireflies! |
Download Printable Instructions
Step 1Begin by forming the body of the bee with yellow dough and rolling out the stripes with black dough. Then wrap the stripes around the body of the bee. |
|
Step 2Next, make two wings using the white insulating dough, and eyes using white and black dough. Attach the wings and eyes to the bee’s body. *Add googly eyes for a fun effect! |
|
Step 3Make the center of the flower with white dough and six petals using orange dough. Attach the petals as shown. |
|
Step 4Attach the buzzer to the flower and another piece of orange dough. Insert the red wire into the flower and the black wire into the piece of dough. |
|
Step 5Insert the black wire from battery holder into the piece of orange dough and the red wire into the bee's body. Turn on the power switch and touch the bee to the flower to complete the circuit and make noise! |
Download Printable Instructions
Step 1Roll a piece of purple dough into a ball. This will be the body of the octopus. |
|
Step 2To make the arms, roll out eight thin pieces of purple dough. Keep one half of the arm straight and create a coil with the other half. Do this for all eight arms. |
|
Step 3Arrange the octopus arms so that the straight portions come together in the center. Make sure the opening in the center can be covered by the body. *The next three steps are shown from a side view. |
|
Step 4Cut the round ball for the body in half to create a top half and a bottom half. Place a thin piece of white insulating dough on top of the bottom half of the body. Then place the top half onto the insulating dough to form the whole body. |
|
Step 5Insert the long LED leg into the top portion of the body and the short leg into the bottom portion of the body. |
|
Step 6Last, insert the red wire from the battery into the top half of the body and the black wire into the bottom half of the body. Turn on the battery holder to light up your octopus! |
Step 1Begin by forming the body using the orange, blue, and green |
|
Step 2Next, arrange the balls of dough by alternating color. The |
|
Step 3With the white insulating dough, create a thin disc shape |
|
Step 4Add the LEDs to your caterpillar. Insert the short leg of the |
|
Step 5Add the googly eyes to the head of your caterpillar for a |
|
Step 6Light up your creation by attaching the battery holder to the |
Download Printable Instructions
Step 1Begin by forming the ears of the bunny with blue dough. Rolling out the stripes with white dough. Then attach the white stripes on the base of the ears. Use the blue dough to make the base of the bunny’s head. Assemble as shown. |
|
Step 2Next, make two teeth using the white insulating dough. Using the blue dough make to cheeks. Making the nose out of the black dough. Attach to the base of the bunny. |
|
Step 3Roll out the eyebrows using the blue dough. Making the eyes using white and black dough. Attach the eyes as shown. |
|
Step 4Create the base of the carrot with the orange dough, using the green dough to create the leaves. Marking the carrot base and leaves. Attach the buzzer to the carrot and another piece of orange dough. Insert the red wire into the carrot and the black wire into the piece of dough. |
|
Step 5Insert the black wire from battery holder into the piece of orange dough and the red wire into the bunny. Turn on the power switch and touch the bunny to the carrot to complete the circuit and make noise! |
Download Printable Instructions
Step 1Create body by rolling a large piece of dough into “tear drop” shape. |
|
Step 2To create tail pinch out the narrow end of “tear drop” body into fan shape. Raise tail to stand off of table. |
|
Step 3To create eyes roll out two white balls and two smaller black balls. Place the black dough on top of the white dough to make eyes. Place on side of whale head. |
|
Step 4Use insulate white dough to make blowhole. Place on top of whale’s head. |
|
Step 5Roll a small tube of conductive for the water spout. Stand up on top of white blowhole. |
|
Step 6Insert the short leg of the LED into the water spout. Be sure to place the longer LED leg into the whale’s body. This is also where the red wire from the battery holder will be inserted. |
|
Step 7Last, attach the battery holder to the whale. Insert the red wire into the whale’s body and the black wire into the water spout. Turn on the battery holder to light up the whale. |
Download Printable Instructions
Step 1Create the body of the UFO using the green, yellow and white insulating dough. Sandwich a thin circle of white dough between a flattened green circle and a yellow half circle. |
|
Step 2Make the round antenna and turbo vent rings using orange dough. Attach the antenna to the top of the yellow and the turbo vents can be evenly spaced on the green area. |
|
Step 3Create the landing gear for the UFO by rolling out three balls of orange dough to be the same size. These will be attached to the bottom side of the green dough. |
|
Step 4Attach five LEDs by inserting the wire prongs into the colored dough. Make sure that the longer wire is inserted into the yellow dough and the shorter wire is inserted into the green dough. |
|
Step 5Last, attach the battery holder. Insert the red wire into the yellow dough and the black wire into the green dough. Turn on the battery holder to see the lights shine. |
Download Printable Instructions
Step 1Create the hull and wheelhouse of the tugboat using purple dough. The wheelhouse should look like a cube, and the hull should be shaped like a boat. |
|
Step 2Create the windows for the wheelhouse using yellow dough. You will need two side windows and larger front window. Attach the windows to the wheelhouse. |
|
Step 3Using the white insulating dough, make a thin square roughly the same size as the bottom of the wheelhouse. Sandwich the white insulating dough between the wheelhouse and the hull. |
|
Step 4Place the buzzer on top of the wheelhouse. This will be the smokestack for the tugboat. The wires will need to face the back of the boat. Insert the red wire into the rear of the hull, and insert the black wire into the back of the wheelhouse. |
|
Step 5Last, attach the battery holder to the tugboat. Insert the red wire into the hull and the black wire into the back of the wheelhouse. Turn on the battery holder to make the buzzer sound. |
Download Printable Instructions
Step 1Roll out a large piece of dough and create a hollow area in the rear. |
|
Step 2Place the fan motor inside the hollow area and the buzzer on top of the submarine body. |
|
Step 3To create porthole windows, roll out and flatten three small balls of blue dough. Place the windows on the side of the submarine body. |
|
Step 4Roll a small tube for the periscope of the submarine. Place the periscope in front of the buzzer. |
|
Step 5Roll out a ball of orange dough and blue dough. These will be used to complete the circuit, inserting the black wires into the blue ball and the red wires into the orange ball. |
|
Step 6Last, attach the battery holder. Insert the red wire into the orange ball and the black wire into the blue ball. Turn on the battery holder to spin the fan blade and turn on the buzzer. |
Download Printable Instructions
Step 1Create the bodies by rolling a piece of purple dough and a piece of blue dough into oval shapes. |
|
Step 2Create arms by forming two pieces of blue dough and two of purple dough into tear drop shapes. Form a heart shape for the feet. |
|
Step 3Place the purple arms and feet onto the blue body and the blue arms and feet onto the purple body. |
|
Step 4Roll out and flatten three small oval shapes using the white dough and three smaller circles using blue and purple dough. Place two eyes on the blue body and one on the purple. |
|
Step 5Insert the short leg of the LED into the blue buddy's head and the longer leg into the purple buddy's head. |
|
Step 6Last, insert the red wire from the battery holder into the blue feet and the black wire into the purple feet. Turn on the battery holder to light up your squishy buddies! |
Download Printable Instructions
Step 1Create body by rolling three pieces of white insulated dough into large, medium, and small balls. |
|
Step 2Next, roll out four pieces of black dough. Flatten two and place between your white body pieces. (save remaining two for next step) |
|
Step 3Use the remaining two pieces to create the hat and place on top of snowmans head. |
|
Step 4Roll out two pieces of black dough for buttons and a small cone with orange dough for the nose. Then place on snowman. |
|
Step 5Insert the short leg of each LED into black dough of lower body. Insert the longer legs into black dough of upper body. |
|
Step 6Last, insert the red wire from battery into black dough of upper body and the black wire into black dough of lower body. Turn on the battery holder to light up your snowman. |
Download Printable Instructions
Step 1Roll out long pieces of purple, orange, and black dough. |
|
Step 2Attach the two ends of the purple strip and form a smile. |
|
Step 3To create the eyes, split the black strip in half and create two arches. Roll out two small pieces of black dough and attach to the bottom of the arches to complete each shape. |
|
Step 4Roll two small ovals using black dough and place between the arches to finish the eyes. |
|
Step 5Split the orange strip of dough into five pieces and create wavy hair. |
|
Step 6Place all dough pieces in the formation of face and place the Piezo buzzer as the nose. Roll out orange and black balls. Insert the buzzer’s red wire into the orange ball and black wire into the black ball. Repeat this process with the battery holder. Turn on the battery holder to hear the buzzer. |
Download Printable Instructions
Step 1Roll out two pieces of green dough and form one for the head and the other into a cone shape for the tail. |
|
Step 2Roll out two more pieces of green dough and connect them together using a piece of white dough. |
|
Step 3Make five triangles with blue dough for the sea monster’s spikes and then attach along the body. |
|
Step 4Create the eyes using white and blue dough and attach to the head. Flatten two pieces of blue dough for the water and place the sea monster’s body on top. |
|
Step 5Insert the short leg of LED into one piece of green dough and the longer leg into the other. |
|
Step 6Last, insert the red wire from the battery into one piece of blue water and the black wire into the other. Turn on the battery holder to light up your sea monster! |
Download Printable Instructions
Step 1Create the body of the rocket using the red and yellow dough and white insulating dough. Sandwich the insulating dough between the yellow and red dough. Attach the buzzer to the bottom of the body. |
|
Step 2Cut three fins out of the blue dough and attach to the base of the rocket. |
|
Step 3Create the nosecone and cockpit area. Attach these elements to the rocket. Roll out a small ball of blue dough to be used later. |
|
Step 4Attach three LEDs by inserting the wire prongs into the colored dough. Make sure that the longer wire is inserted into the yellow dough and the shorter wire is inserted into the red dough. |
|
Step 5Last, attach the battery holder and the switch. Insert the red wires from the battery holder and buzzer into the red dough. Insert the black wire from the buzzer into the yellow base piece and the black wire from the battery holder into the blue ball. Insert the black wire from the switch into the blue ball and the red wire into the yellow base piece. Turn on the switch to sound the buzzer and make the lights shine. |
Download Printable Instructions
Step 1Create two robot feet. |
|
Step 2Build a robot body around the buzzer. Wires go out the back. |
|
Step 3Create robot arms. |
|
Step 4Build a robot head out of white insulating dough, and make the eyes out of regular dough. Attach eyes to the head. |
|
Step 5Create a strip with regular dough and attach to the back of the robot head. |
|
Step 6Assemble the robot body parts together. Add LEDs to the side of the head with the long wire from the LED going into the body and the short wire into the strip on the back of the head. |
|
Step 7Plug the red terminal from the buzzer into the body near the feet. Insert the black terminal into the strip on the back of the robot head. Place terminals from the battery holder in the same locations based on color. Send power to the robot by turning on the battery holder. |
Download Printable Instructions
Step 1Using the yellow dough, make four legs, a head, and a body. |
|
Step 2With the black dough, form four little disks and attach them to the end of the legs. |
|
Step 3Roll out a tube of white insulating dough and wrap it in a ribbon shape. Make a disk and place the ribbon on the disk to create a scarf. |
|
Step 4Next, attach the legs, scarf, and head to the body. |
|
Step 5Make two triangles with yellow dough for ears. Use the black dough to make two antlers. Attach the ears and antlers to the head. |
|
Step 6Next, make two little ovals out of black dough. Make a small white disk for the base of the nose. Attach the LED by sticking the shorter prong into the base of the nose and the other into the scarf. |
|
Step 7Attach the battery pack by inserting the red wire to the longer LED prong and black wire to the other. Turn the battery switch on to light up your reindeer. |
Download Printable Instructions
Step 1Make the stem and leaves using green dough. |
|
Step 2Create a flat circle for the center of the flower and wrap it with a strip of white insulating dough. |
|
Step 3Next, wrap a strip of yellow around the white dough. |
|
Step 4Create the petals for the flower. You will need six petals for this step. |
|
Step 5Next, attach the center of the flower to the stem and add the petals to the outside of the flower center. |
|
Step 6Insert the LEDs into the flower. Be sure to place the longer LED leg into the red dough. This is also where the red wire from the battery holder will be inserted. |
|
Step 7Last, attach the battery holder to the flower. Make sure the red wire inserts into the red part of the flower and the black wire is inserted into the yellow outside ring. Turn on the battery holder to light up the flower. |
Download Printable Instructions
Step 1Create a rectangle and taller square out of red dough for the truck’s body. Create indents in the dough for wheels. |
|
Step 2Roll out four pieces of blue dough for the wheels and place within the indents of the truck. |
|
Step 3Flatten a piece of white dough and place between the two truck body pieces. Create a small red rectangle and attach to the top of the truck. |
|
Step 4Create the ladder and windows using white dough and attach to the truck. |
|
Step 5Insert the short legs of LEDs into the head of the truck and the longer legs into the truck body. |
|
Step 6Last, insert the red wire from the battery into the back of the truck and the black wire into the front. Turn on the battery holder to light up your fire truck! |
Download Printable Instructions
Step 1Create the body with a large piece of blue dough and attach four smaller pieces for the legs. |
|
Step 2Create the eyes, ears, and trunk using blue and white dough. Attach the pieces to the front of the elephant’s body. |
|
Step 3Roll out two pieces of white dough into cone shapes to create tusks and attach to the elephant. |
|
Step 4Using your green dough, create the tree trunk and four raindrop shapes for the leaves. Attach the leaves to top of the trunk. |
|
Step 5Roll out a ball of green dough. Connect the black wires from the buzzer and battery holder to the green ball. Next, connect the red wire from the battery holder to the tree trunk and the red wire from the buzzer to the elephant. Once you turn on the battery holder, touch the elephant and tree together to make noise! |
Download Printable Instructions
Step 1Using the blue dough, create four small squares for the dinosaur’s feet. |
|
Step 2Next, roll out a piece of blue dough and form into the body shape. |
|
Step 3Attach the four feet to the dinosaur’s body. |
|
Step 4Roll out and flatten a piece of white insulating dough. Attach the strip along the back of the dinosaur. |
|
Step 5Next, roll out two strips of blue dough the same length as the white piece. Place side by side on top of the white strip without allowing them to touch. |
|
Step 6Create the eyes using white and blue dough, then attach to the dinosaur’s head. Insert the short leg of LEDs into one piece of blue dough on top of the body and the longer legs into the other. *Add googly eyes for a fun effect! (not included) |
|
Step 7Insert the red wire from battery holder into one strip of blue dough and the black wire into the other. Turn on the battery holder to light up your dinosaur! |
Download Printable Instructions
Step 1Make top and bottom shells with red dough. Place insulation layer in between the shells. |
|
Step 2Create claws and legs and attach them to the lower shell of the body. (They cannot touch the top body shell). |
|
Step 3Attach the LEDs to the body of the crab. The longer wire from each LED should go into the bottom shell, and the shorter wire will insert into the top shell. |
|
Step 4Finally, attach the terminals from the battery holder. Insert the red terminal into the bottom shell and the black terminal into the top shell. Turn on the battery to light up the eyes on the crab! |
Download Printable Instructions
Step 1Roll out two long strips of purple dough and form each into a "W" shaped squiggle. |
|
Step 2Roll out four small pieces of purple dough and form them into doughnut shapes. |
|
Step 3Attach each doughnut shape to the ends of the two squiggle shaped strips. |
|
Step 4Insert the long legs of LEDs into one of the doughnut shapes at the end of one strip and the shorter legs into a doughnut on the end of the other strip. |
|
Step 5Insert the red wire into doughnut on the other end of the first strip and the black wire into the doughnut on the second strip. Turn on the battery holder to light up your circuit! |
Download Printable Instructions
Step 1Begin by rolling out two pieces of blue dough. Make sure they are roughly the same size. |
|
Step 2Next, connect an LED to both pieces of dough. Leave enough space between the dough pieces so that they do not touch. |
|
Step 3Insert the red wire from the battery holder into one piece of dough that also has the longer LED terminal. The black wire will then be inserted into the dough with the shorter LED terminal. Turn on the battery holder to light up the LED. |
|
Step 4Divide the piece of dough that is connected to the black wire to create two equal size pieces. Now create a small gap by moving the dough still connected to the wire away from its other half. Your battery holder should stay turned on. |
|
Step 5Your conductor test is now ready to use. Place an object between the cut pieces of dough. Make sure the object makes contact with both pieces to complete the circuit. If the LED lights up, the object is a conductor. If the LED does not light up, the object is an insulator. |